My Favorite Things: 5 Ways to Bring Metal into Your Home

Welcome to My Favorite Things! Each month, we highlight products to help you create a holistic lifestyle that inspires and nurtures you, so that you can be happier and feel supported.

For April, we move forward in our series on the five elements and talk ways to bring the Metal element into your space. The Metal element is related to the Benefactors and Completion areas of the bagua map and is very helpful in balancing the ability to stand up for yourself and to remain focused and efficient. Be sure to listen to tomorrow's podcastFeng Shui and the Metal Element, to learn more about how to balance the Metal element!


Wind Chimes and Bells

Adding a wind chime or bell to your space is one of the easiest ways to balance out the Metal element. There are so many beautiful options for wind chimes, but be sure to look for chimes or bells made of metal material, as this relates directly to the Metal element. 

This is a bell that I have on my desk to ring in more prosperity and abundance!

When you hang a bell or chime, it's also important to ensure that it has space to ring or chime. These small adjustments are powerful in many ways and can signify change and the arrival of benefactors.

Available at: Feng Shui Shopper


SAARINEN TULIP TABLE

I love the Saarinen Tulip tables, especially in white marble. They're truly a classic. They come in many sizes and are customizable in material and color. White marble is a gorgeous addition to any space in itself, but it can also help to bring in the Metal element!

I have a white Saarinen side table in my living room, which is in the Completion (yin metal) area of my home.

White, circular, marble tables add Metal to your space because of the shape and color. The Metal element is related to the color white and circular shapes, so keep this in mind when customizing! 

Available at: Design Within Reach


Benjamin Moore: Simply White Paint

We've talked about the benefits of choosing white paint in your spaces, but opting for white walls can also add the Metal elemnt to a room. 

Because the Metal element is related to the color white, going for the purest color in the color wheel can help provide balance for a space with too little metal. One of my go-to whites is Benjamin Moore's Simply White. It also happens to be the Benjamin Moore color of 2016.

Check out our other blog posts on my favorite white paints.

Available at: Benjamin Moore


Agate Non-Metal Feng Shui Rings

Everyone always wonders why I have a delicate agate ring on my middle finger on my right hand... well it's a feng shui adjustment!

Non-metal rings like these agate rings can balance out too much or too little metal. For women, wear it on your middle finger, right hand. For men, the same but on the left hand.

This personal qi feng shui adjustment can help if you talk too little or too much, as the metal element is related to the mouth. Don't fret if it breaks; it's doing its job! Be sure to listen to the podcast or read our blog post about the five elements to learn more!

Available at: Holistic Spaces
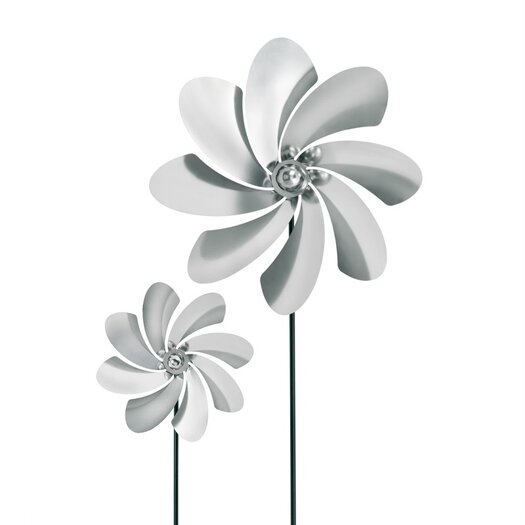

Metal Pinwheels

I have these lovely metal pinwheels in two places in my home. Not only do they add more metal element to your spaces, they're beautiful, and they can go indoors or outdoors. 

Pinwheels also have the secondary effect of stirring up the qi in your holistic spaces, to get things really moving. 

It may be beneficial to locate these in your Benefactors area to stir up and attract more helpful people in your life. Or skillfully placed in the center of the Knowledge area of your property (outside or inside), pinwheels may bring winds of change to your self-cultivation and spiritual life.

Available at: All Modern


Dents, Holes and Pops: Prepping Your Walls for Paint

There’s nothing quite like setting your brush down, sliding back into your favorite cozy space and admiring a well-painted room. Before you get to that point, however, there’s ‘pre-paint’ legwork that must be done, starting with the repair of holes in your wall. Before you crack open the bucket of joint compound and grab the joint knife, keep reading. Not all wall damage is created equal. 

Small Dings, Nail Holes and Dents

Before you break out the joint compound, scrap away any loose paint or other debris from the area you’re repairing. Using your joint knife, spread the compound over the small area requiring repair. You should completely fill in the damaged space. Using the joint knife, pull away excess compound to make it level with the rest of the wall. Allow the space to dry according to the directions on the package. Keep in mind that it may take as long as 24 hours, so plan your room renovations accordingly. Once the repaired section is dry, sand it smooth and get ready to paint!

Small Holes

Don’t confuse ‘small’ with the nail-sized holes mentioned above. We’re talking about the hole created from a doorknob that met a wall with a little more pop and punch than it ought to have. If you’ve got a repair about that size, you’re going to need a bit more than joint compound and sandpaper to fix things. Pick up a peel-and-stick patch to repair this type of damage. The patch is a screen covered by fiberglass. Remove the backing and press the patch into place over the hole. Now pull out your joint compound and joint knife. Cover the mesh patch with layers of compound being careful to smooth each layer and level it off with the wall. Plan on applying three coats in total, letting each coat dry before applying the next one. Once the final coat is dry, sand the repaired area smooth and flush with the rest of the wall. Now you’re ready to paint! 

Note: You can find repair kits with patches for holes up to about six inches. Some patches are mesh like the one described above. Others will be a reinforced center panel surrounded by self-sticking tape. Larger holes require a different approach that we’ll cover in a future blog article.

Nail Pops

When you look at your wall, do you see small protrusions about the size of a nail head? This happens when the nails used to affix drywall to the studs pull away from the wood. You’ve got two choices on how to repair this, but both begin with scrapping away the ‘popped’ bit of drywall until the head of the nail is exposed. One option is to drive the nail back into the stud. Once you’ve done that, drill a drywall screw into place slightly above the nail to reinforce the drywall. Alternately, you can remove the offending nail and replace it with the drywall screw above or below the original hole. Regardless of which option you select, make sure the nail head and screw are slightly recessed into the drywall creating a dimple. Grab that joint compound again and fill in the small holes created by the removed (or re-driven) nail and the new screw. As above, wait until it’s fully dry and then sand the compound down again for a smooth even finish.

by Anjie Cho


Marble Countertops: Are They Right for You?

Crisp. Cool. Distinctive. Elegant. If those words are describing countertops, we must be talking about white marble. Marble is a timeless classic that is right at home in a wide range of décor styles and rooms. Whether you’re looking to finish off your kitchen, upgrade your bathroom or incorporate a workstation in a home office, marble should be on your list for consideration. Like any material, marble has its pros and cons. 

Pros

  • Classic beauty – Marble is the Audrey Hepburn of countertops: classic, timeless beauty that exudes sophistication. It’s the only natural stone that comes in bright, crisp white, with or without grey veins running through it.
     
  • It’s got personality - As a natural stone, marble offers a unique, “no-two-are-alike” style that will give your countertop its own distinctive flair. Marble doesn’t conduct heat. It’ll remain cool to the touch, a welcome feature in kitchens and spa-like bathrooms alike. With age, marble takes on a patina. If you’re intrigued by a surface that tells the story of its lifespan with you, then marble is a terrific choice. 
     
  • Affordable – Unless you’re selecting a more rare variety of marble, this natural stone tends to be within a price range that's comparable to other countertop options. In some cases, it’s even more affordable than other natural stones. 

Cons

  • It’s a softy – The same thing that gives aged marble a story to tell may be a turn-off for some. Simply put, marble is prone to staining and scratching. Even with regular sealing, marble may show traces of the red wine you once spilled in the kitchen or hints of your favorite shade of blush on the bathroom counter.

Tips for living with marble

If the pros outweigh the cons for you (and for so many of us they do!), take note of these general maintenance tips:

  • Seal your marble and reseal it at least once a year (or sooner in high use areas). A sealer doesn’t mitigate stains and scratches, but it does give you some time to respond. A splash of wine on a well-sealed countertop that’s wiped up in due time might never leave a clue that it was there. 
     
  • Be gentle when cleaning. If you wouldn’t wash your hands with it, don’t use it on your marble. Avoid acidic cleaners and abrasive cleaners or pads. Marble prefers mild soaps (such as dish detergent) and warm water with a cloth or sponge. Need something a little tougher? Look for a natural stone cleaner.
     
  • When you’re choosing your marble countertop, opt for polished finishes over honed. Polished is more stain resistant, whereas honed is more porous and prone to staining. 

If your idea of the perfect countertop is one that retains the pristine, glossy shine from the day you bought it, then marble isn’t the right choice. Conversely, if you are attracted to a countertop loaded with unique character and beauty, classic marble may be for you!

by Anjie Cho